 How to resolve AdBlock issue?
 XOR Electronics NerdSEQ sequencer - Part 1
Author and photos: Peter Kaminski
A sequencer is a central module in any electronic music setup. The concepts here are very different. In this article, we would like to take a look at the NerdSEQ by XOR Electronics in the Netherlands.XOR Electronics was founded in 2016 by Thomas Margolf. Thomas comes from Wuppertal. In his private life, he had moved to the Netherlands. He made chip music using old computers for years and has performed all over the world. In 2012, he began developing the Nerdsynth. It became the NerdSEQ, which has been on the market since 2017.
Due to the complexity of the product, or rather the product, we present the NerdSEQ in several articles, starting with the hardware structure and basic operation.
Module concept
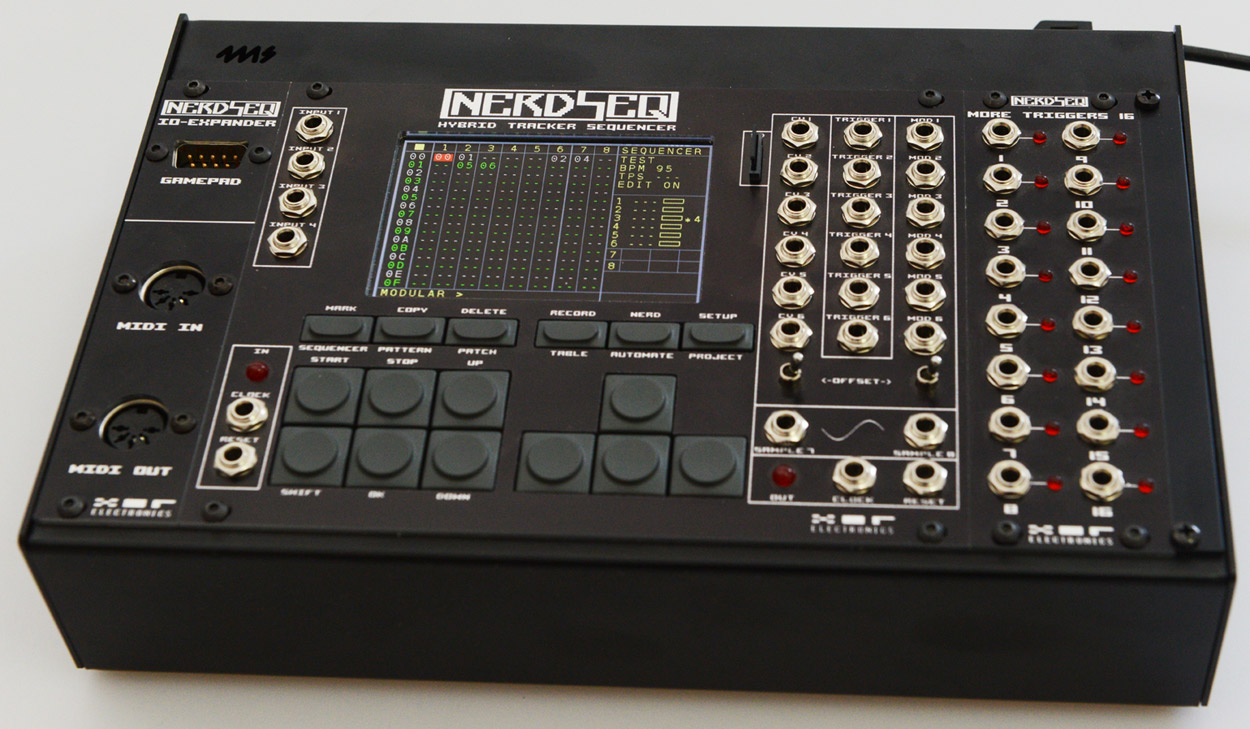
The NerdSEQ is the only Eurorack-compatible sequencer I know of that has a modular design. Hardware development also continues; thus, further module options will be offered in the future, which we will discuss in a second part. It must also be said that the technical concept of the NerdSEQ is designed in such a way that it goes far beyond classic sequencers, extending to sound generation.

First, we would like to give you an overview of the modules currently available (as at the time of publication of this article):
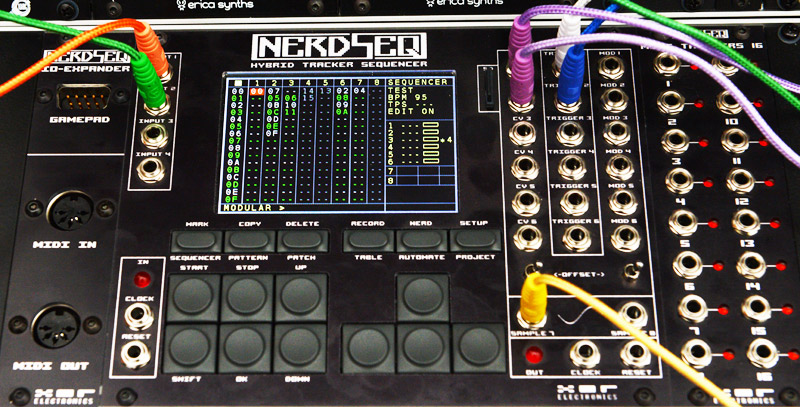
- NerdSEQ base module with 3.5-inch color display and user interface (top, central module),
- MIDI module "IO-EXPANDER" (above, left module),
- "Trigger 16 Expander" (top, right module) Trigger output module,
- "CV 16 Expander" with a further 16 CV outputs.
In addition to the MIDI input and output (DIN socket), the IO-EXPANDER provides a connection to a Sega gamepad. MORE TRIGGERS 16 adds 16 trigger outputs for drums to the basic module, and MORE CV 16 provides a further 16 CV outputs.
It is very commendable that all modules are available in three color combinations:
- Silver with black buttons,
- Silver with black areas around the sockets,
- and completely black with dark gray keys.
It should also be noted that for reasons of contrast, the buttons in our photos appear brighter than they are perceived by the human eye in reality.
There are two busses on the back of the base module, one for the MIDI module and another for trigger and CV modules, to which up to four optional modules can be connected, including several CV or trigger-out modules in any combination - i.e. a maximum of 64 triggers or 64 additional CV outputs.
Basic module
NerdSEQ is equipped with eight tracks, regardless of the number of connected modules. Tracks 7 and 8 are permanently assigned to the internal sample player. Each sample track can be used to play two samples, which are output at the two SAMPLE 7 and 8 sockets. The D/A conversion at the two sample outputs is performed only with an 8-bit word width and a maximum sampling rate of 44.1 kHz. The sample memory is only 200 kilobytes in size, which corresponds to approx. four seconds of sample length at 44.1 kHz. The samples can be brought into the system via an SD card. 16-bit WAV files can also be loaded. The SD card is also used to update the firmware and save projects.
The remaining six tracks can be assigned individually, i.e., to CV, MIDI or trigger outputs. The base module itself has six CV, six trigger, and six modulation voltage outputs. The voltage ranges for the six CV and six MOD outputs can be individually set between -5 ... +5 volts and 0 ... 10 volts.
The basic module also offers four CV inputs that can be routed internally via a matrix. This allows you to record CV data and gates, for example, and tracks assigned to MIDI. The clock and reset inputs and outputs with an LED indicator for clock activity are also available for synchronization.
Sequencer structure
The NerdSEQ is a classic tracker sequencer, like the ones you used to know from PC programs running under DOS or Amigamany years ago. However, donˊt worry about this because the NerdSEQ is implemented on a completely different level. In the screen display, the tracks do not run horizontally, but vertically. Therefore, the playback direction is from top to bottom and not from left to right, as is used in DAWs. A different multiplier for the speed can be specified for each track, from a factor of 2, 3, 4, 5 ... to 8, as well as 1/2, 1/3, 1/4, 1/5 ... 1/8, 1/16, 1/32. More on timing later.
We have already discussed the track structure. To summarize: two sample tracks plus six individual tracks. Each track offers up to 256 slots for so-called patterns. A maximum of 175 different patterns are possible, which are simply numbered consecutively when created. The numbers cannot be changed afterwards. Each pattern can be up to 64 steps long.
There are so-called patches for modifying tracks or patterns. A maximum of 176 patches are possible. These are also numbered consecutively. But that's not all. In addition to patches, so-called tables can be created in a pattern. A table is something like a sequence within a pattern. A total of 32 such tables with up to 16 steps can be created. We would like to explain the basic function using a practical example. In a pattern with a sequence of 1/16 notes, you want to insert a quick cluster of 1/64 notes at one point - Tangerine Dream sends its regards. You can do this by calling up a table with cluster notes at the desired position. But there is much more you can do with it. I will discuss this more later.
There are also so-called automation slots. A maximum of eight of these slots are available to the NerdSEQ user. These can be used to modulate certain parameters. An application example is, for example, the modulation of the gate length of a track via an LFO.
The entire structure described here is summarized in a project. The number of possible projects is only limited by the memory capacity of the SD card. In addition, settings are not saved in the project; they are saved globally for all NerdSEQ projects.
Operation

At this point, letˊs consider a look at the buttons for operating the NerdSEQ. The upper row of buttons with smaller buttons is used to call up individual pages or dialogs, such as Sequencer, Pattern, Patch, Table, Automate, and Project. In conjunction with the Shift key, you can call up additional functions using these keys, such as mark, copy, delete, start recording, settings, etc.
The keypad with the six buttons Shift, Start, Stop, OK, and Page Up/Down is self-explanatory. The four-button keypad on the right is used to navigate a page and to change parameters coarsely (up/down) or finely (right/left) when the Shift button is pressed.
The Shift key also comes into play repeatedly. For example, by using the Play button, you can start a single selected pattern with Start. With Shift and Start together, you can start a complete sequence. This also plays a role with the Stop button, for example. Only the Stop button stops the sequence at the end of a sequence; however, Shift and Stop buttons stop the sequence immediately.
So much for the basic description of the button functions. Of course, we do not want to write an alternative operating manual here; however, the individual functions can be best understood by presenting individual operating pages or dialogs. The screen graphics best illustrate the functions.
Configuration
Use the key combination Shift + Setup to access the page for the global system settings.

Compact Sequence, Compact Tables, or Compact Patch can be used to delete certain things and system parameters such as highlighting rows on the pattern page (Row Highligh amount) to obtain a better overview. If the value here is 4, then every fourth row is highlighted. You can also set whether a gate length is automatically entered in addition to the pitch when a note is created (Auto Gate on Note), or after what time, or whether a screen saver should be activated at all.

If you scroll down further, you will also see a menu item to access the customization of the user interface. Here (see figure above) you can adjust colors and change the system font. The potential result is displayed as an example in the lower half. I first changed the default font, which is very difficult to read. All pages shown here have been created using font 4.
Project
After pressing the PROJECT button, the corresponding project settings dialog opens. Basic parameters, such as the tempo and clock input and output values, can be specified, and projects can be saved and loaded.
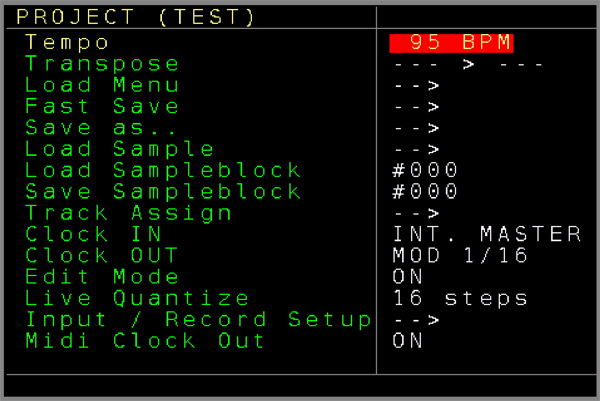
An important dialog is the "Input / Record Setup" (see figure below).

Here, you can assign the outputs for tracks 1 to 6. The 3 x 6 outs on the NerdSEQ base module are MODULAR. However, you can also assign tracks for MIDI applications or to one of the connected trigger out modules.

If you select a track using the OK button, the corresponding dialogs open. There you can, for example, set the track playback speed or perform transpositions etc. For analog outputs (see illustration above), you can also select the voltage output format for the relevant track between 1 V/octave, 1.2 V/octave, or Hz/V.
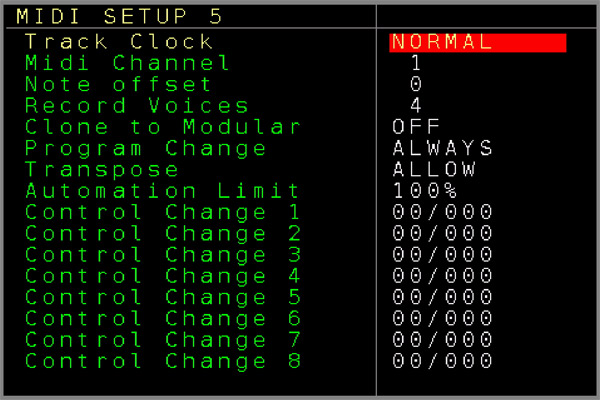
With MIDI, you can set the MIDI channel or the number of voices, among other things, and you can set control changes (see illustration above).
Sequencer and pattern

We now arrive at the actual sequencer. The sequencer page displays the eight tracks, and patterns can be assigned to each track from top to bottom or created in empty fields by pressing the OK button (see illustration above).
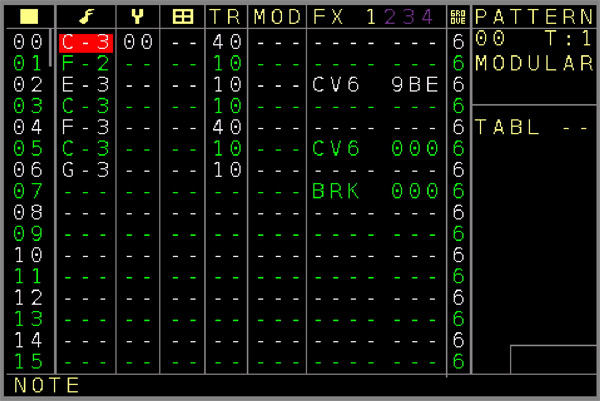
If a field with a pattern is selected and you press the PATTERN button, the pattern editor page opens (see illustration above). Depending on the track assignment and use (modular, MIDI, trigger, sample), this is structured slightly differently in detail.
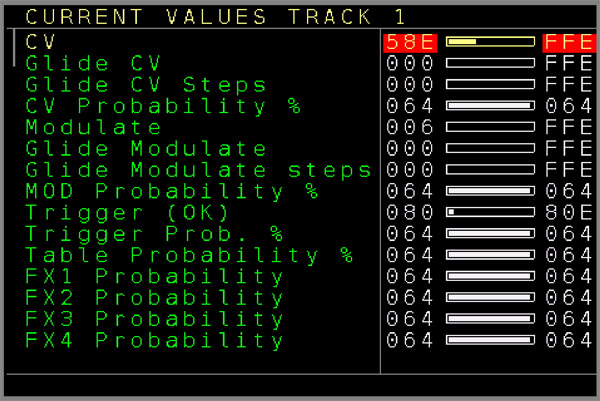
For the events on modular tracks, notes, patches, tables, gate lengths, modulations, and effects are displayed (from left to right) or can be entered and changed. The notes are indicated as usual with the note name plus the octave. When specifying gate lengths, you also have the option to trigger gates multiple times. Effects can be used to initiate actions at a specific step, such as the output of a specific voltage at a CV output or a command to repeat or end a loop. There is a wide range of commands that can be executed here.

You can also apply actions to several patterns at the same time, thereby deleting or copying a block. To do so, use the Mark button. If you are in mark mode (see illustration above), you can mark fields using the cursor down button and then apply the function to these fields.

At this point, we would also like inform you about the Nerd button. If certain fields are selected, this function can also be used to perform other functions, such as transposing (see illustration above) or color-coding selected blocks.

Polyphonic playback is also possible with MIDI. Here, note-on or note-off events can be set instead of gate lengths per step (see illustration above).

For tracks with assigned trigger-out expanders, there is also a page on which the user can view a grid display to set triggers for individual outputs per step (see illustration above). This editor page is somewhat hidden and you have to scroll through to find the end.
Recording
It is also important for a tracker sequencer to not only be able to enter notes via an editor, but also to play them in. This is possible via the CV inputs and MIDI-IN. An important dialog to set this up is the project submenu "Input / Record Setup".

For recording, Live Input and MIDI Data Input may need to be activated first. The four CV inputs can be switched to CV outputs via Input X LIVE so that you can also hear what is being played (monitoring). Further parameters for the four CV inputs can then be used to switch them to tracks for recording.
Here is a practical tip at this point. Many people use Arturia’s Keystep as their CV keyboard. However, as the CV is only stable a few milliseconds after the gate edge, you should select the "CV Note + Trig" function for the input channel and set a trigger delay of 5 milliseconds (see illustration above). Then the NerdSEQ will also work with the Keystep without any problems.
In addition to recording MIDI notes during a recording process triggered by the Shift plus RECORD button, it is also possible to record a pressed note in a manually selected step at any time. In this case, however, only individual notes are transferred to the selected cell. This function is activated by assigning a MIDI channel to the "MIDI Step Chnl." parameter. The normal record function is then deactivated. This function is available for both MODULAR- and MIDI-assigned tracks.
Patch, table, and automation
In the sequencer editor, various parameters can be applied to an entire track via a patch (see illustration above) or value ranges can be limited.
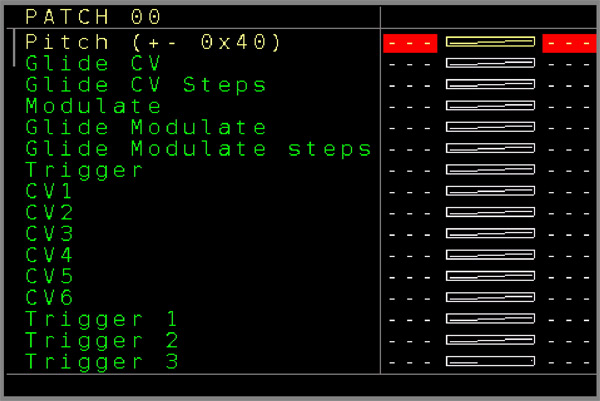
In the pattern editor, patches can be integrated into a step and then trigger various actions, such as a CV glide (see illustration above).

In the first column of the table editor, you specify whether you wish to jump to another step. In the second column, you can transpose, and in the third double column, you can enter "effects". These can be modulation voltages, but also notes or gates, for example. The tempo of a table can also be changed in relation to the pattern using a clock multiplier.
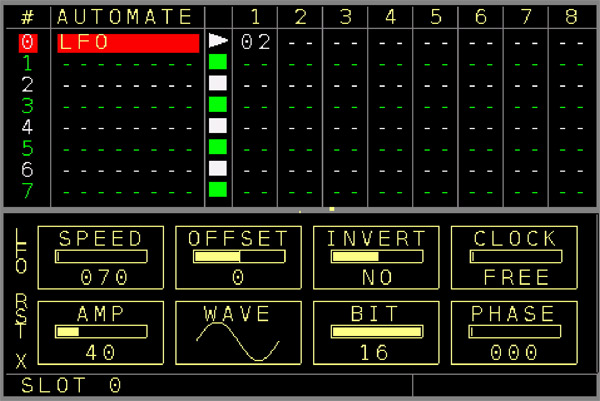
Here is an example of automation (see illustration above). In NerdSEQ version 1.21, you can select an LFO or one of the CV inputs per slot and then modulate a specific parameter on a track. In our example, an LFO is on track 1, and it modulates parameter 02 (gate length).
Practice
After this overview, we would like to discuss an initial practical assessment, and it is worth mentioning that we performed the test with firmware 1.21.
One thing is clear, the NerdSEQ is clearly one of the more complex Eurorack sequencers. This is also clear from the various parameters. With the FX parameters, you have to work with the NerdSEQ for a long time to know all these parameters by heart. Reaching for the manual is often the case, especially at the beginning. However, it is also clear that the complex structure with the patches and tables and the automation makes highly complex structures possible.
However, some things take some getting used to, such as the specification of the gate length. For example, the specification 10, 20, 30, and 40 correspond to a gate lengths of 5, 10, 15 or 20 milliseconds, etc. The second digit of the parameter value indicates the number of repetitions. Therefore, a parameter value of 11 means a gate with a length of five milliseconds and one repetition. However, if the first number is 0, then an inverse gate is output. Thus, the parameter value 01 moves from Off to On with a length of five milliseconds, which, in practice, corresponds to a delayed gate. Somehow the name NerdSEQ says it all.
With a product like this, there are bound to be wishes, such as an integrated metronome with a count-in via the integrated sampler or the ability to change the pattern numbers afterwards. The fact that the sampler only has an 8-bit D/A word width is something you can overcome or you can see it as a feature because 8-bit drum samples in particular have their charm.
The NerdSEQ should appeal to users who simply want more detailed control and want to experiment more with sequencers and not just play eight steps in a row in a loop. Other sequencers can also perform that task. However, there are many things where the NerdSEQ has unique selling points. I believe that the NerdSEQ is currently the most complex sequencer system in the Eurorack segment from a functional perspective. However, the end of the line is far from being reached because Thomas Margolf is constantly driving development forward, both in terms of software and hardware.
Conclusion
The price of the basic module is well below 600 euros, the IO-EXPANDER for the MIDI extension is around 50 euros, the Trigger 16 Expander is around 150 euros, and the CV 16 Expander is around 160 euros.
The NerdSEQ is actually much more than a simple sequencer because it can take complete sequence control of a live session or in a MIDI studio. It is also interesting for users outside Eurorack applications. This is why XOR Electronics will also be offering a NerdSEQ in a desktop case with the NerdSEQ Portable.