 How to resolve AdBlock issue?
 Supperware Head Tracker 1
Synchronisation of head movement via acoustic virtualisation
Author and photos: Peter Kaminski
Immersive and Dolby Atmos music productions are increasing, but not every studio is equipped with a 3D audio loudspeaker setup or there are no loudspeaker monitoring systems available for mobile use. One solution is binaural monitoring via headphones. There are various options to increase the quality here. In addition to using an individual HRTF via a SOFA file, one option is head tracking, which we would like to discuss here in the form of a product, namely the "Head Tracker 1" from Supperware. The developer behind Supperware is Ben Supper from the UK.
Why head tracking?
This is a question that some of you are probably asking yourself at this point, especially if you work in music production and not in gaming or VR. The first theoretical answer is that head tracking should also improve localisation in binaural monitoring. When we perceive an environment acoustically, we also turn our heads, and the perceived sound impression and directional perception change accordingly. This is not the case with binaural monitoring via headphones without a head tracker and corresponding software, as the sound field remains static independent of any head movements.
Now you have to ask yourself why the sound field or directional perception should be synchronised with the head movement at all. If, for example, you turn 90 degrees to the right during production to play a MIDI keyboard and the sound field rotates, then this would seem to be a disadvantage. But that´s not what head tracking is for in the case of music production; it’s more small movements in the normal listening position that should be synchronised. We don’t actually listen with our ears, which are only sensors, but with the brain, where sound impression ultimately results. Head movements are also subconsciously used to calibrate individual sense of direction. Head movements with head tracking support can also be used to localise a virtual sound source or object in acoustic 3D space more precisely.
Headtracker integration
The implementation of head tracking, or the acoustic synchronisation of the head movements, occurs in the binauralization monitoring plug-in in the DAW. Most binauralisers now support head tracking, but Supperware also offers its own free binauralisation plug-in for its head tracker. Communication between the head tracker, or more precisely, the head tracker software and binauraliser, takes place via OSC (Open Sound Control), a type of extended MIDI protocol via IP ports.
We will discuss the connection of Headtracker to various applications later. However, one thing can be said right away: The Head Tracker 1 from Supperware is the most widely supported head tracker.
Scope of delivery
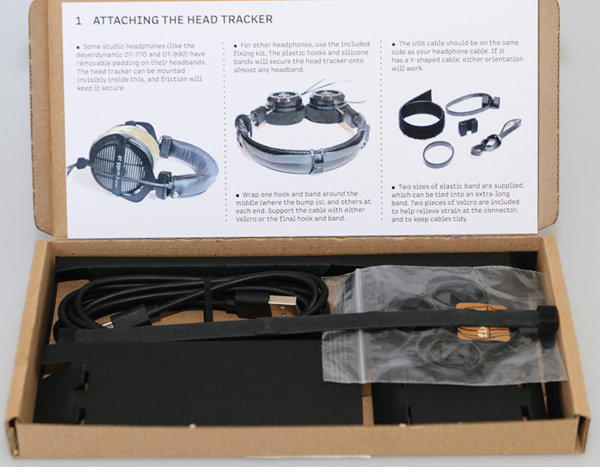
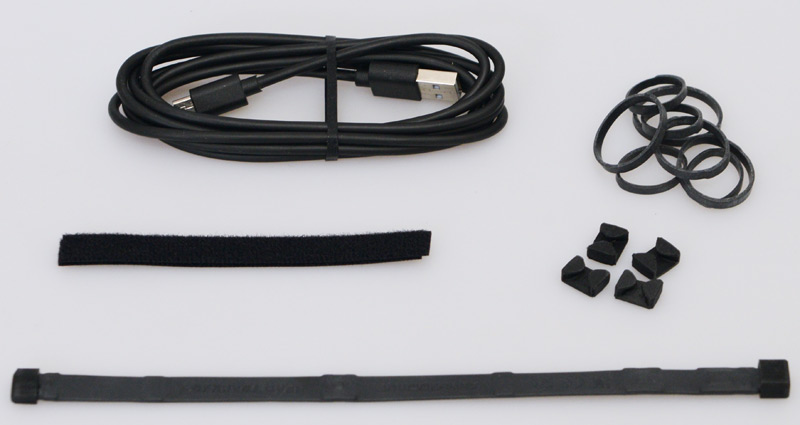
But now let's get to the product. The Head Tracker 1 is supplied with a quick start guide, USB cable, and fastening material in the form of eight elastic bands in two sizes with four plastic clips for the elastic bands for the head tracker band fastening and two Velcro straps for cable fastening.
Further information about its use can be found on the manufacturer’s website in the form of several videos.
Headtracker technology
![]()
The head tracker itself consists of a band (216 x 12 x 5 mm) containing the electronic components: an electronic compass (visible in the centre of the band) that reacts to the magnetic field, two three-axis gyroscopes, and three acceleration sensors. The weight is only six grammes. At one end, there is a USB micro-socket for connecting a computer (see illustration below).
The accuracy of the resolution is greater than one degree and is transmitted with a resolution of approximately 0.03 degrees. The response time/latency is approx. ten milliseconds and the data rate approx. 115 kBit/s.
Supperware Binaural Plug-In
The easiest way to use the Head Tracker 1 is to use the Supperware plug-in, which is available as a VST3 plug-in for Windows and macOS, or as an AudioUnit plug-in (macOS only) via the manufacturer´s website. The VST3 plug-in can be installed by copying the plug-in into the corresponding folder - i.e. not via an installer.
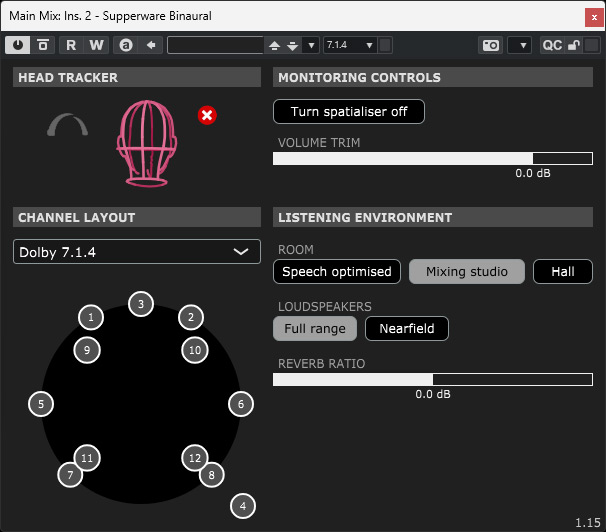
The plug-in provides binauralisation of input signals in speaker formats up to 9.1.6 and 22.2. It also offers room simulation with three selectable rooms (speech optimisation, mixing studio and hall) with adjustable reverb and selectable loudspeaker simulations (full-range or near-field monitoring).
Basic settings and compass calibration are also possible. If the data is not being received correctly by the head tracker, this is also signalled (via the "BAD DATA" display, see illustration above). The advantage of the Supperware binauralization plug-in is that the Head Tracker 1 is natively supported, and no other software is required - only for calibrating the gyros/accelerometers or for firmware updates, if necessary.
Bridgehead software
Supperware provides the "Bridgehead" software, which can be downloaded from the manufacturer’s website, for basic settings, firmware updates, calibration, and connection via OSC to other binauraliser plug-ins. Installation is then performed using an installer programme for macOS or Windows operating systems.
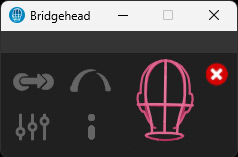
When Bridgehead starts (see illustration above), you will see four icons at the bottom of the screen for the various selectable settings dialogues, namely OSC settings (top left icon), head tracker settings, app settings, and update check (bottom right icon), as well as the current head position in a graphical view when connected to the head tracker. The head tracking connection can be cancelled manually using the red icon with the cross. This display with its icons and the head tracker alignment is always visible at the bottom, even after selecting one of its dialogues.
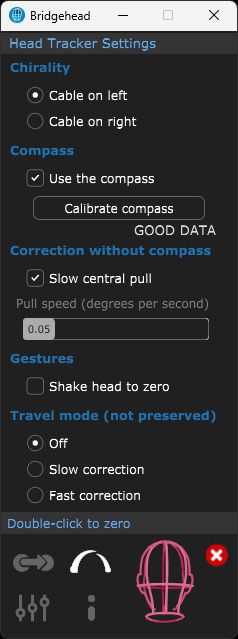
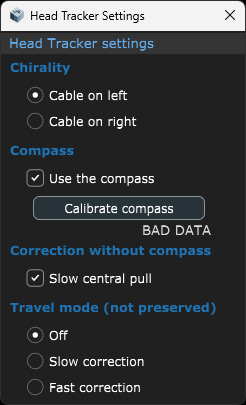
First, let’s take a look at the head tracker settings dialog (see illustration above). Here, you can select whether the cable connection of the head tracker band is on the left or right side of the headphones. More about calibration and parameters later. So much for now: the "Travel Mode" is intended for mobile operation, for example in vehicles, and should not concern us further here.
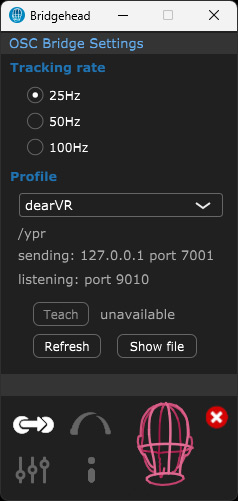
Communication between the head tracker and binauralizer plug-in takes place via the bridgehead using the OSC protocol. The position update data rate can also be set. In our experience, 25Hz is sufficient, and higher update rates may be too much for some DAWs.
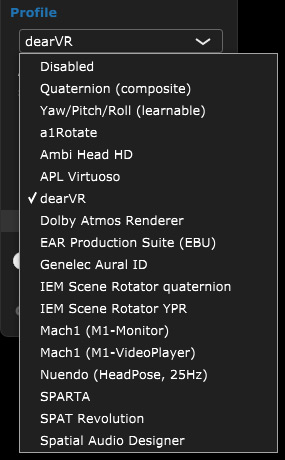
In the dialog, you have to select the plug-in that you want to connect to the head tracker (see illustration above). The selection is large, and the most common plug-ins and manufacturers are offered.
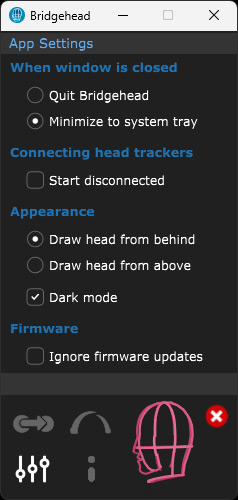
The plug-in settings can be made in a further dialog. Users can select here whether the application should be stored in the system tray as an icon for reopening after closing the window or whether the application should be closed completely. Auto-starting the programme after the computer starts, the display mode (light/dark) can also be changed, and the notification of any new firmware can be suppressed.
Calibration
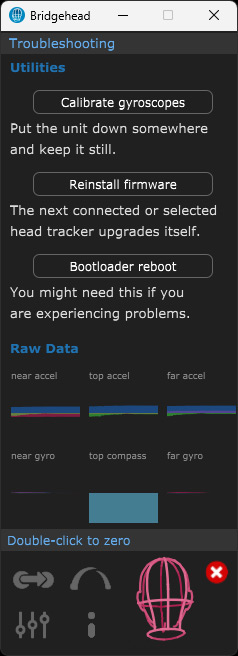
When the string button is pressed, an icon for the so-called troubleshooting mode is displayed instead of an icon for the app setting. The corresponding dialog then opens after clicking on the icon (see illustration above). Firmware updates can be performed, and the bootloader can be reinitialized if required. You also have an overview of the data streams of individual sensors, which is very useful for checking the head tracking function.
Let’s now move on to the calibration process, which is carried out in two stages: calibration of the compass and calibration of the gyro sensors. The compass calibration is started via the dialog for the head tracker settings (Calibrate compass). You then have to move the headphones with the head tracker mounted back and forth once in all three axes and then circle across all axes until the message GOOD DATA appears in the dialogue. It sounds complicated, but it is demonstrated in a clear video by Supperware.
The calibration of the gyroscope sensors is started in the troubleshooting dialog by clicking on "Calibrate gyroscope". Now you have to hold the headphones completely still until the calibration process is complete. The head tracker can now be used.
The compass should be calibrated more frequently. Calibration of the gyroscope sensors is less frequently required and is therefore a little more hidden in the software.
For zero current positioning, look straight ahead and double-click the graphic representation of the head. You may have to do this more often. More on this in the practical section.
Application
Let us now consider some examples with binauralization plug-ins and their settings because the information provided by the manufacturer is limited. The Dolby Atmos Renderer can also be found in the selection of supported applications. However, this refers to the Dolby Renderer as standalone software. When using the Dolby Atmos Renderer integrated into the DAW software, you have to use a binauralization plug-in if you want to use head tracking.
dearVR Monitor
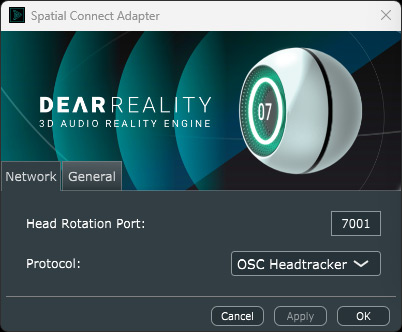
dearVR Monitor 2 from Dear Reality also supports head trackers. In the Bridgehead software, you have to select "dearVR" in the OSC dialogue. In addition to the Bridgehead software, installation of the Dear Reality software component "Spatial Connect Adapter" is required for connection (see illustration). "OSC Headtracker" is selected as the protocol here.
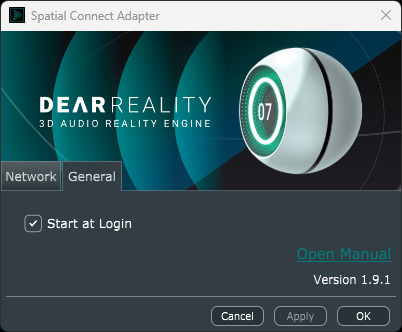
If you work a lot with the Headtracker and dearVR Monitor 2, it is recommended that this component is started automatically when the computer is booted (Start at Login).
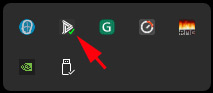
An icon is visible in the system tray after startup (see figure above), which is marked with a green symbol if connected to the head tracker (red if not connected).
APL Virtuoso
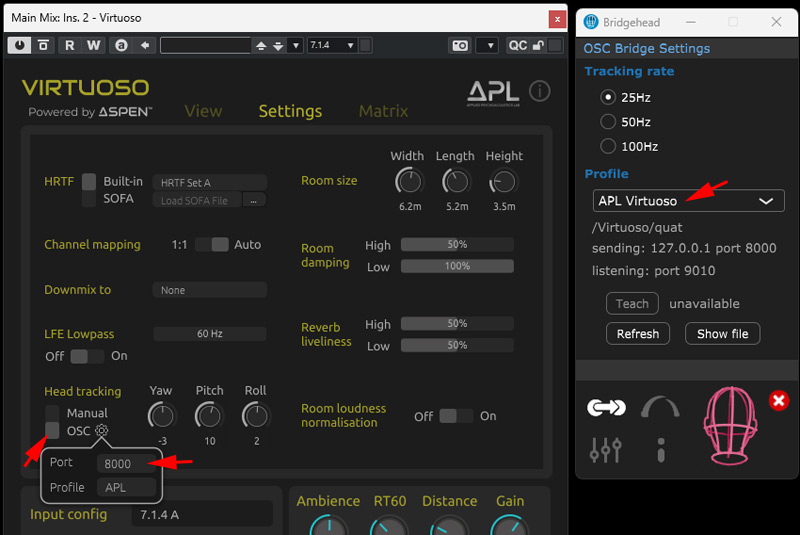
Connecting the Virtuoso binauraliser plug-in from APL is relatively simple. Select "APL Virtuoso" as the profile for Bridgehead, then activate head tracking via OSC in the plug-in, and adjust the port to 8000 if necessary.
Noisemakers Binauraliser Studio 2
When using the Binauralizer Studio 2 plug-in from Noise Makers, select the "Ambi Head HD" profile in Bridgehead.
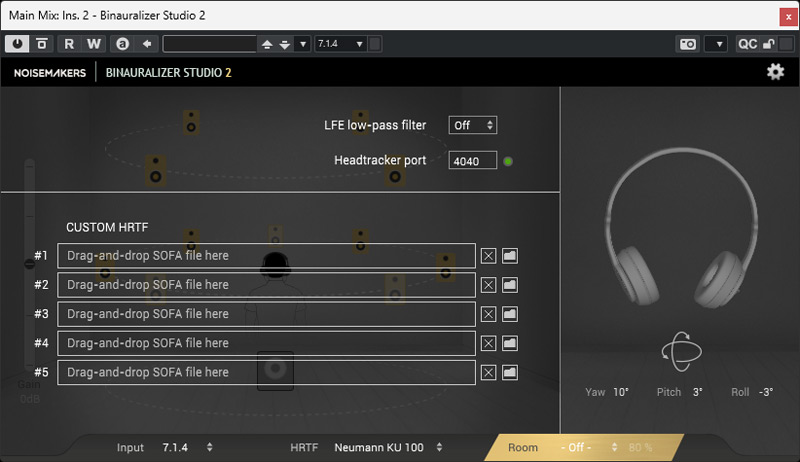
The head tracker port in the plug-in should then be set automatically. You may have to adjust it manually.
Steinberg Cubase/Nuendo
Binauralisation is also possible internally with Cubase and Nuendo via on-board means. For this purpose, you have to use the VST Ambi Decoder. The whole thing works via the Ambisonics 3D audio format. Unfortunately, this is somewhat complicated, and diversions via Ambisonics are not recommended for Dolby Atmos productions due to the limited resolution and maximum Ambisonics order in Cubase/Nuendo. You should rather choose the route via another binauralization plug-in that can also handle standard loudspeaker 3D audio formats, such as 7.1.4 or 9.1.6. However, we would like to describe the integration process anyway.

Select the "Nuendo (HeadPose, 25Hz)" profile for Bridgehead.
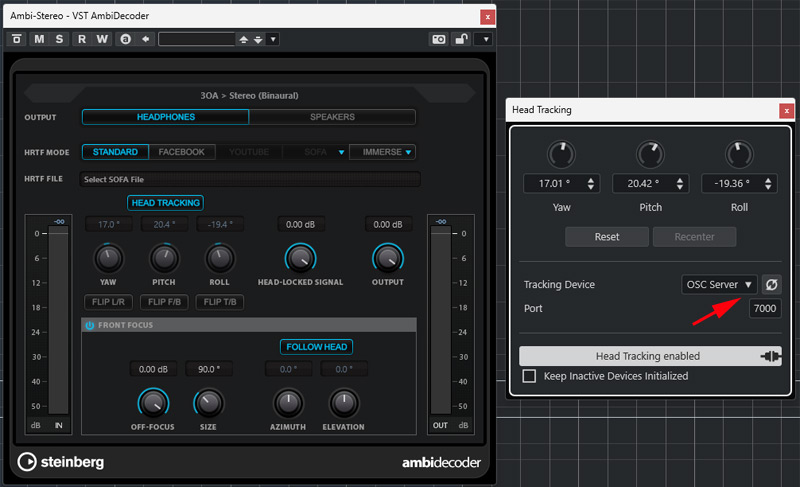
Then, you have to configure Cubase or Nuendo accordingly and activate head tracking in AmbiDecoder. We have already tested the AmbiDecoder. A look at the test can help with the configuration. Prior to this, head tracking must also be set to "OSC Server" and port 7000 in the corresponding Cubase/Nuendo dialogue (see illustration above). The dialog can be called from the Studio menu.
Using the headphones
Now let´s move on to attach the head tracking band to the headphones. One problem you always have is that steel is usually used for headphone headbands, which can be magnetised. Unfortunately, this always affects the function of the compass on the head tracker. Let's take a look at typical headband headphones.
Headband Austrian Audio Hi X65
Above is an Austrian Audio Hi-X65 headphone with a gap in the headband. We recommend mounting them on one of the two sides of the headband.
Headband Audeze LCD 2 Classic
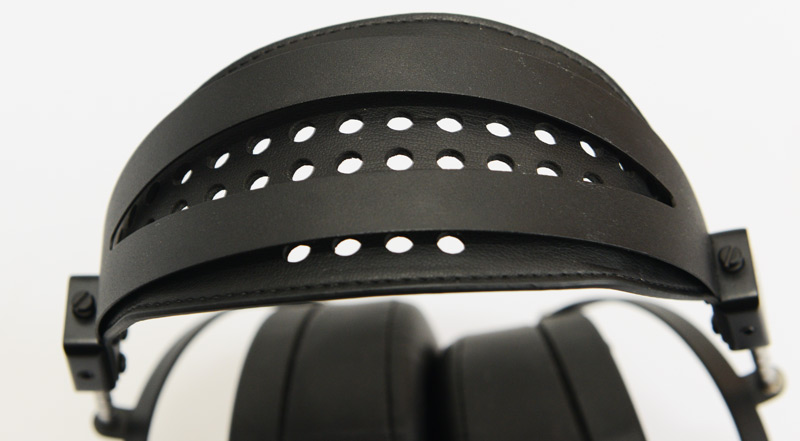
The Audeze LCD-2 (see illustration above) has two metal headband parts and a band underneath that rests on the head. However, it is also practical to attach the headband to one of the metal brackets.
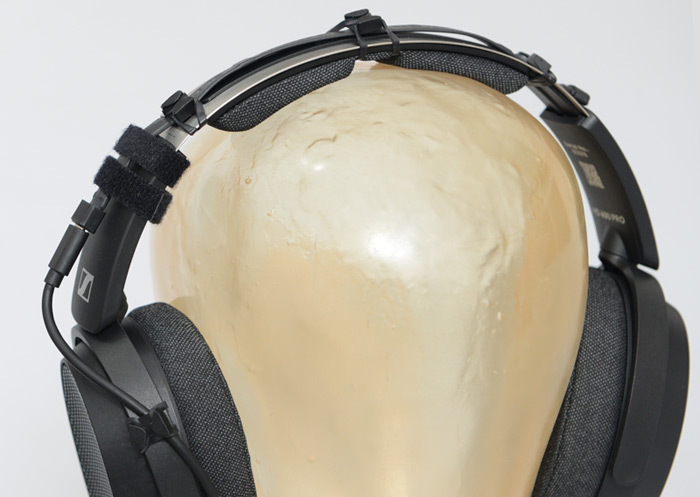
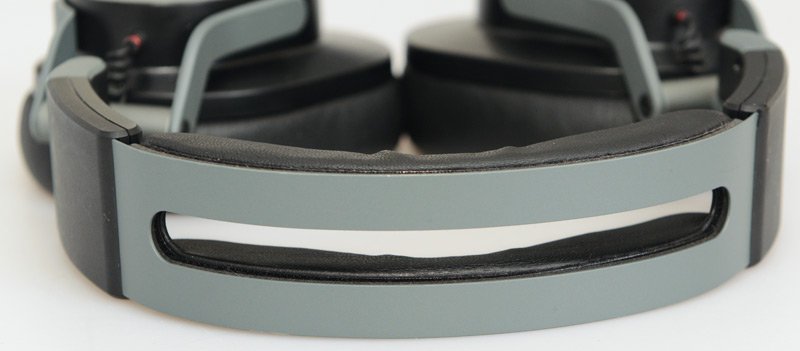
Sennheiser HD 490 PRO headband
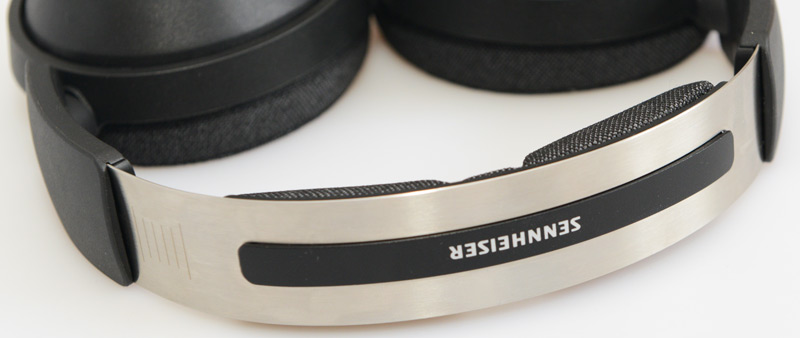
The Sennheiser HD 490 PRO uses a steel band as the headband. A plastic piece is attached over it. The width of this is very well suited for holding the head tracker band, and there is a small distance to the magnetisable metal band.
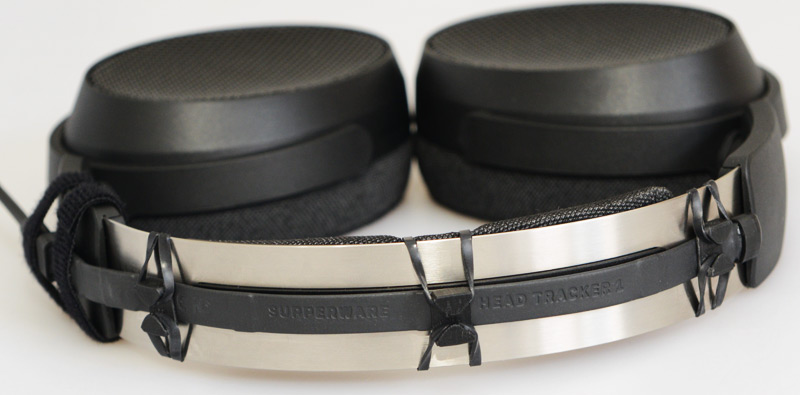
Using the Sennheiser HD 490 PRO as an example, we have shown how the head tracker band and USB cable can be attached using the rubber bands and clips provided and the two Velcro straps.
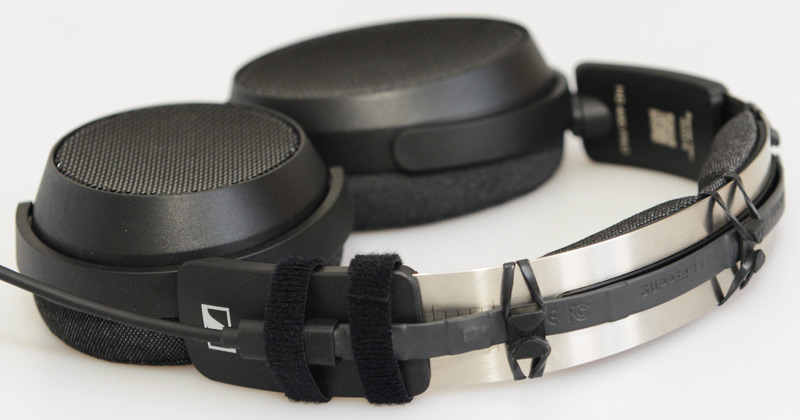
The USB cable supplied with the headset (the original cable can be seen in the pictures) is completely unsuitable for this application because it is not sufficiently flexible. We recommend, for example, the Jamega micro USB cable (USB A to micro USB B) with a textile fabric cover, which is available in different colours and lengths and offers a high degree of flexibility and robustness. In addition, the micro USB B plug on Jamega cables is very small. The cables cost less than 10 euros for a three metre micro USB cable. A worthwhile investment.
In practise
We tested the connection of Supperware Head Tracker 1 on the Windows 11 operating system on the AudioKern B14 DAW from D.A.S. There were no problems with the installation and operation of the software. The head tracking itself is negligible compared to the required processing power of the binauraliser.
The calibration of the compass is easy to internalise after a while and can be performed quickly. The resolution and latency are more than sufficient for practical operation. Quantisation is not audible - even at an update rate of 25 Hz. One drawback is that there is a drift to the side if you look down for a while, for example, at the keyboard, controller, or low screen. Here, you have to play around with the pull-speed parameter to at least partially compensate for this effect. What you have to do more often is to reset the zero point position by double-clicking on the graphic head display. Unfortunately, with third-party binauralization plug-ins, this can only be done using the Bridgehead software, whose window you first have to open when working with the DAW host software. We can only hope that in future, it will also be possible to reset this directly in the binauralizer plug-in. There is also the option of initiating the reset by shaking the head; however, I couldn´t get to grips with this in practise and prefer to use the mouse.
The question that arises now is what effect head tracking has. I would like to answer this question by describing an effect that occurred to me. When I was experimenting with the head tracker and a binaural plug-in with room simulation at the beginning of the test, I suddenly thought: "Why are the speakers still active?" I have muted the loudspeakers. I then fiddled with the controller to find the issue until I took off the headphones and realised that the loudspeaker was not active at all, but that I had actually been listening via headphones. I have already used the same plug-in many times previously, but this effect has not occurred without using the head tracker. Of course, when listening through headphones without head tracking, the sound field rotates in sync with the turning of the head. However, this is not the case when listening via loudspeakers. The sound source always remains fixed in the same place. Head tracking therefore significantly improves the realistic impression of virtual loudspeaker listening via headphones. This has nothing to do with 3D audio but also performs its job when listening to normal stereo material. Sometimes, our brains can simply be tricked, especially when our visual and auditory impression are synchronised. That was my first positive experience using the head tracker.
When working with binauralized 3D audio, two additional effects can also be observed with increased use of head tracking. First, the localisation of objects is improved but you also use head movements more consciously to locate objects that you are unsure where they are placed via binauralization. Of course, you also do this in everyday life - but you tend to do it subconsciously. This helped me because the binauralization process doesn´t always manage to create a completely realistic perception of sound. Here, the use of head tracking combined with individual HRTFs can also improve perception. You should definitely try this out. Unfortunately, not all binauralization plug-ins support loading individual HRTFs using SOFA files.
Conclusion
The Supperware Head Tracker 1 can be purchased only from the manufacturer´s online shop in the UK. The cost of the tracker itself is just over 100 euros. Thanks to Brexit, customs duties, and import sales tax are due in addition to the shipping costs for costumers in Germany. This is a highly recommended option for users regularly working with binauralizers or studio simulation plugins. The position drift and the necessary reset to the zero position are still somewhat disruptive issues in the workflow, but overall head tracking offers significant added value in the acoustic virtualisation process when listening to headphones. You are simply a big step closer to the acoustic reality.